🍏 Nextflow Workflow 🍏
Why nextflow?
Nextflow helps Autometa produce reproducible results while allowing the pipeline to scale across different platforms and hardware.
System Requirements
Currently the nextflow pipeline requires Docker 🐳 so it must be installed on your system. If you don’t have Docker installed you can install it from docs.docker.com/get-docker. We plan on removing this dependency in future versions, so that other dependency managers (e.g. Conda, Mamba, Singularity, etc) can be used.
Nextflow runs on any Posix compatible system. Detailed system requirements can be found in the nextflow documentation
Nextflow (required) and nf-core tools (optional but highly recommended) installation will be discussed in Installing Nextflow and nf-core tools with mamba.
Data Preparation
Metagenome Assembly
You will first need to assemble your shotgun metagenome, to provide to Autometa as input.
The following is a typical workflow for metagenome assembly:
Trim adapter sequences from the reads
We usually use Trimmomatic.
Quality check the trimmed reads to ensure the adapters have been removed
We usually use FastQC.
Assemble the trimmed reads
We usually use MetaSPAdes which is a part of the SPAdes package.
Check the quality of your assembly (Optional)
We usually use metaQuast for this (use
--min-contig 1option to get an accurate N50).
This tool can compute a variety of assembly statistics one of which is N50. This can often be useful for selecting an appropriate length cutoff value for pre-processing the metagenome.
Preparing a Sample Sheet
An example sample sheet for three possible ways to provide a sample as an input is provided below. The first example provides a metagenome with paired-end read information, such that contig coverages may be determined using a read-based alignment sub-workflow. The second example uses pre-calculated coverage information by providing a coverage table with the input metagenome assembly. The third example retrieves coverage information from the assembly contig headers (Currently, this is only available with metagenomes assembled using SPAdes)
Note
If you have paired-end read information, you can supply these file paths within the sample sheet and the coverage
table will be computed for you (See example_1 in the example sheet below).
If you have used any other assembler, then you may also provide a coverage table (See example_2 in the example sheet below).
Fortunately, Autometa can construct this table for you with: autometa-coverage.
Use --help to get the complete usage or for a few examples see 2. Coverage calculation.
If you use SPAdes then Autometa can use the k-mer coverage information in the contig names (example_3 in the example sample sheet below).
sample |
assembly |
fastq_1 |
fastq_2 |
coverage_tab |
cov_from_assembly |
|---|---|---|---|---|---|
example_1 |
/path/to/example/1/metagenome.fna.gz |
/path/to/paired-end/fwd_reads.fastq.gz |
/path/to/paired-end/rev_reads.fastq.gz |
0 |
|
example_2 |
/path/to/example/2/metagenome.fna.gz |
/path/to/coverage.tsv |
0 |
||
example_3 |
/path/to/example/3/metagenome.fna.gz |
spades |
Note
To retrieve coverage information from a sample’s contig headers, provide the assembler used for the sample value in the row under the cov_from_assembly column.
Using a 0 will designate to the workflow to try to retrieve coverage information from the coverage table (if it is provided)
or coverage information will be calculated by read alignments using the provided paired-end reads. If both paired-end reads and a coverage table are provided,
the pipeline will prioritize the coverage table.
If you are providing a coverage table to coverage_tab with your input metagenome, it must be tab-delimited and contain at least the header columns, contig and coverage.
Supported Assemblers for cov_from_assembly
Assembler |
Supported (Y/N) |
|
|---|---|---|
[meta]SPAdes |
Y |
|
Unicycler |
N |
|
Megahit |
N |
|
You may copy the below table as a csv and paste it into a file to begin your sample sheet. You will need to update your input parameters, accordingly.
Example sample_sheet.csv
sample,assembly,fastq_1,fastq_2,coverage_tab,cov_from_assembly
example_1,/path/to/example/1/metagenome.fna.gz,/path/to/paired-end/fwd_reads.fastq.gz,/path/to/paired-end/rev_reads.fastq.gz,,0
example_2,/path/to/example/2/metagenome.fna.gz,,,/path/to/coverage.tsv,0
example_3,/path/to/example/3/metagenome.fna.gz,,,,spades
Caution
Paths to any of the file inputs must be absolute file paths.
Incorrect |
Correct |
Description |
|---|---|---|
|
|
Replacing any instance of the |
|
|
Using the entire file path of the input |
Quick Start
The following is a condensed summary of steps required to get Autometa installed, configured and running. There are links throughout to the appropriate documentation sections that can provide more detail if required.
Installation
For full installation instructions, please see the Installation section
If you would like to install Autometa via mamba (I’d recommend it, its almost foolproof!), you’ll need to first download the Mambaforge installer on your system. You can do this in a few easy steps:
Type in the following and then hit enter. This will download the Mambaforge installer to your home directory.
wget "https://github.com/conda-forge/miniforge/releases/latest/download/Mambaforge-$(uname)-$(uname -m).sh" -O "$HOME/Mambaforge-$(uname)-$(uname -m).sh"
Note
$HOME is synonymous with /home/user and in my case is /home/sam
Now let’s run the installer. Type in the following and hit enter:
bash $HOME/Mambaforge-$(uname)-$(uname -m).sh
# On my machine this was /home/sam/Mambaforge-latest-Linux-x86_64.sh
Follow all of the prompts. Keep pressing enter until it asks you to accept. Then type yes and enter. Say yes to everything.
Note
If for whatever reason, you accidentally said no to the initialization, do not fear. We can fix this by running the initialization with the following command:
$HOME/mambaforge/bin/mamba init
Finally, for the changes to take effect, you’ll need to run the following line of code which effectively acts as a “refresh”
source $HOME/.bashrc
Now that you have mamba up and running, its time to install the Autometa mamba environment. Run the following code:
mamba env create --file=https://raw.githubusercontent.com/KwanLab/Autometa/main/nextflow-env.yml
Attention
You will only need to run the installation (code above) once. The installation does NOT need to be performed every time you wish to use Autometa. Once installation is complete, the mamba environment (which holds all the tools that Autometa needs) will live on your server/computer much like any other program you install.
Anytime you would like to run Autometa, you’ll need to activate the mamba environment. To activate the environment you’ll need to run the following command:
mamba activate autometa-nf
Configuring a scheduler
For full details on how to configure your scheduler, please see the Configuring your process executor section.
If you are using a Slurm scheduler, you will need to create a configuration file. If you do not have a scheduler, skip ahead to Running Autometa
First you will need to know the name of your slurm partition. Run sinfo to find this. In the example below, the partition name is “agrp”.
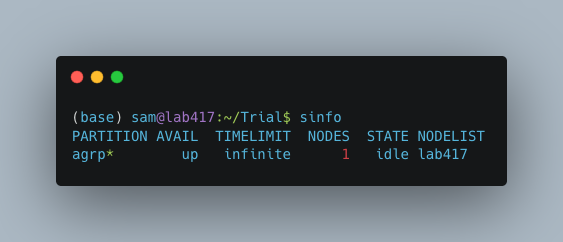
Next, generate a new file called slurm_nextflow.config via nano:
nano slurm_nextflow.config
Then copy the following code block into that new file (“agrp” is the slurm partition to use in our case):
profiles {
        slurm {
            process.executor       = "slurm"
            process.queue          = "agrp" // <<-- change this to whatever your partition is called
            docker.enabled         = true
            docker.userEmulation   = true
            singularity.enabled    = false
            podman.enabled         = false
            shifter.enabled        = false
            charliecloud.enabled   = false
            executor {
                queueSize = 8
            }
        }
    }
Keep this file somewhere central to you. For the sake of this example I will be keeping it in a folder called “Useful scripts” in my home directory
because that is a central point for me where I know I can easily find the file and it won’t be moved e.g.
/home/sam/Useful_scripts/slurm_nextflow.config
Save your new file with Ctrl+O and then exit nano with Ctrl+O.
Installation and set up is now complete. 🎉 🥳
Running Autometa
For a comprehensive list of features and options and how to use them please see Running the pipeline
Autometa can bin one or several metagenomic datasets in one run. Regardless of the number of metagenomes you want to process, you will need to provide a sample sheet which specifies the name of your sample, the full path to where that data is found and how to retrieve the sample’s contig coverage information.
If the metagenome was assembled via SPAdes, Autometa can extract coverage and contig length information from the sequence headers.
If you used a different assembler you will need to provide either raw reads or a table containing contig/scaffold coverage information. Full details for data preparation may be found under Preparing a Sample Sheet
First ensure that your Autometa mamba environment is activated. You can activate your environment by running:
mamba activate autometa-nf
Run the following code to launch Autometa:
nf-core launch KwanLab/Autometa
Note
You may want to note where you have saved your input sample sheet prior to running the launch command. It is much easier (and less error prone) to copy/paste the sample sheet file path when specifying the input (We’ll get to this later in Input and Output).
You will now use the arrow keys to move up and down between your options and hit your “Enter” or “Return” key to make your choice.
KwanLab/Autometa nf-core parameter settings:
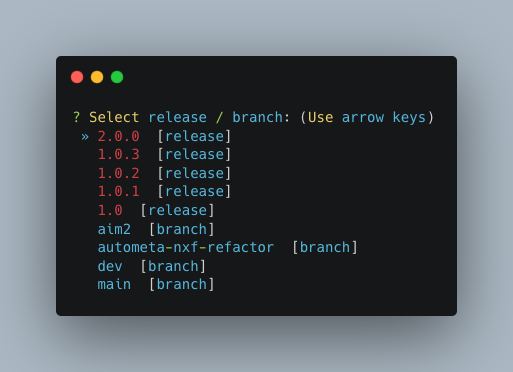
Choose a version
The double, right-handed arrows should already indicate the latest release of Autometa (in our case 2.0.0).
The latest version of the tool will always be at the top of the list with older versions descending below.
To select the latest version, ensure that the double, right-handed arrows are next to 2.0.0, then hit “Enter”.
Choose nf-core interface
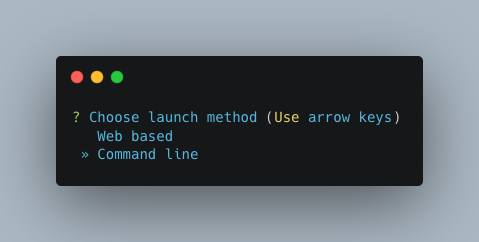
Pick the Command line option.
Note
Unless you’ve done some fancy server networking (i.e. tunneling and port-forwarding),
or are using Autometa locally, Command line is your only option.
General nextflow parameters
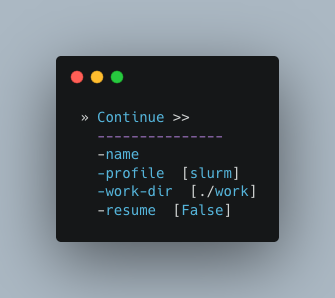
If you are using a scheduler (Slurm in this example), -profile is the only option you’ll need to change.
If you are not using a scheduler, you may skip this step.
Input and Output
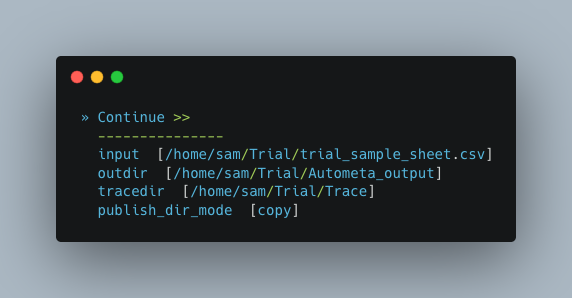
Now we need to give Autometa the full paths to our input sample sheet, output results folder and output logs folder (aka where trace files are stored).
Note
A new folder, named by its respective sample value, will be created within the output results folder for each metagenome listed in the sample sheet.
Binning parameters
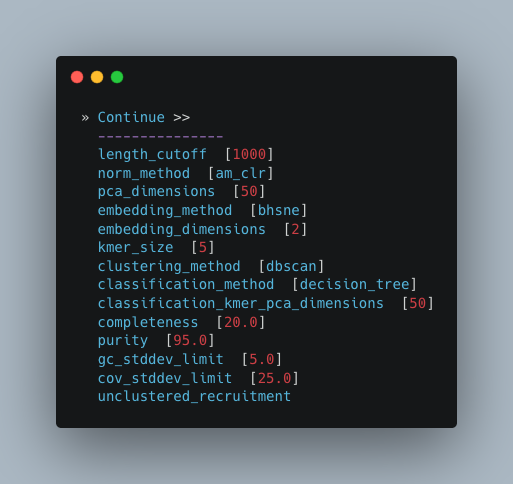
If you’re not sure what you’re doing I would recommend only changing length_cutoff.
The default cutoff is 3000bp, which means that any contigs/scaffolds smaller than 3000bp will not be considered for binning.
Note
This cutoff will depend on how good your assembly is: e.g. if your N50 is 1200bp, I would choose a cutoff of 1000. If your N50 is more along the lines of 5000, I would leave the cutoff at the default 3000. I would strongly recommend against choosing a number below 900 here. In the example below, I have chosen a cutoff of 1000bp as my assembly was not particularly great (the N50 is 1100bp).
Additional Autometa options
Here you have a choice to make:
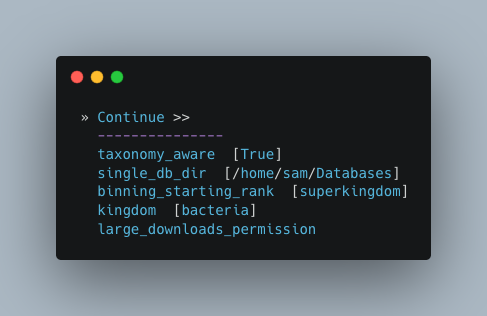
By enabling taxonomy aware mode, Autometa will attempt to use taxonomic data to make your bins more accurate.
However, this is a more computationally expensive step and will make the process take longer.
By leaving this option as the default
Falseoption, Autometa will bin according to coverage and kmer patterns.
Despite your choice, you will need to provide a path to the necessary databases using the single_db_dir option.
In the example below, I have enabled the taxonomy aware mode and provided the path to where the databases are stored
(in my case this is /home/sam/Databases).
For additional details on required databases, see the Databases section.
Computational parameters
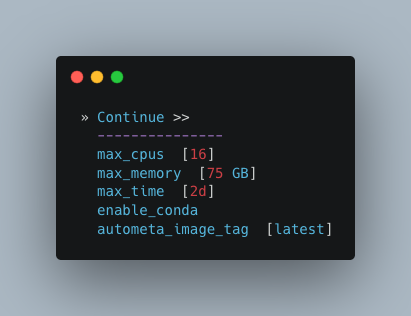
This will depend on the computational resources you have available. You could start with the default values and see how the binning goes. If you have particularly complex datasets you may want to bump this up a bit. For your average metagenome, you won’t need more than 150Gb of memory. I’ve opted to use 75 Gb as a starting point for a few biocrust (somewhat diverse) metagenomes.
Note
These options correspond to the resources provided to each process of Autometa, not the entire workflow itself.
Also, for TB worth of assembled data you may want to try the 🐚 Bash Workflow 🐚 using the autometa-large-data-mode.sh template
Do you want to run the nextflow command now?
You will now be presented with a choice. If you are NOT using a scheduler, you can go ahead and type y to launch the workflow.
If you are using a scheduler, type n - we have one more step to go. In the example below, I am using the slurm scheduler so I have typed n
to prevent immediately performing the nextflow run command.
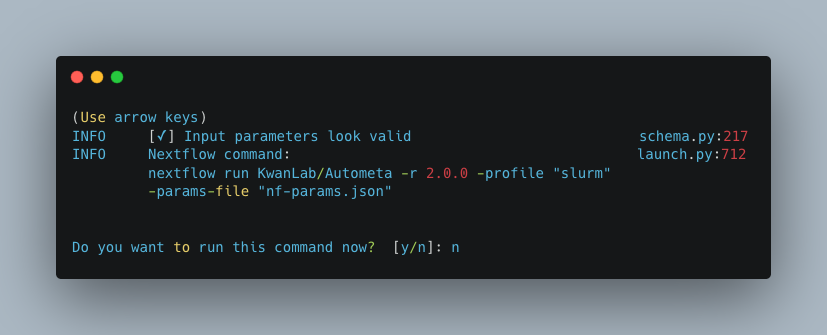
If you recall, we created a file called slurm_nextflow.config that contains the information Autometa will need to communicate with the Slurm scheduler.
We need to include that file using the -c flag (or configuration flag). Therefore to launch the Autometa workflow, run the following command:
Note
You will need to change the /home/sam/Useful_scripts/slurm_nextflow.config file path to what is appropriate for your system.
nextflow run KwanLab/Autometa -r 2.0.0 -profile "slurm" -params-file "nf-params.json" -c "/home/sam/Useful_scripts/slurm_nextflow.config"
Once you have hit the “Enter” key to submit the command, nextflow will display the progress of your binning run, such as the one below:

When the run is complete, output will be stored in your designated output folder, in my case /home/same/Trial/Autometa_output (See Input and Output).
Basic
While the Autometa Nextflow pipeline can be run using Nextflow directly, we designed it using nf-core standards and templating to provide an easier user experience through use of the nf-core “tools” python library. The directions below demonstrate using a minimal mamba environment to install Nextflow and nf-core tools and then running the Autometa pipeline.
Installing Nextflow and nf-core tools with mamba
If you have not previously installed/used mamba, you can get it from Mambaforge.
After installing mamba, running the following command will create a minimal mamba environment named “autometa-nf”, and install Nextflow and nf-core tools.
mamba env create --file=https://raw.githubusercontent.com/KwanLab/Autometa/main/nextflow-env.yml
If you receive the message…
CondaValueError: prefix already exists: /home/user/mambaforge/envs/autometa-nf
…it means you have already created the environment. If you want to overwrite/update
the environment then add the --force flag to the end of the command.
mamba env create --file=https://raw.githubusercontent.com/KwanLab/Autometa/main/nextflow-env.yml --force
Once mamba has finished creating the environment be sure to activate it:
mamba activate autometa-nf
Using nf-core
Download/Launch the Autometa Nextflow pipeline using nf-core tools. The stable version of Autometa will always be the “main” git branch. To use an in-development git branch switch “main” in the command with the name of the desired branch. After the pipeline downloads, nf-core will start the pipeline launch process.
nf-core launch KwanLab/Autometa
Caution
nf-core will give a list of revisions to use following the above command. Any of the version 1.* revisions are NOT supported.
Attention
If you receive an error about schema parameters you may be able to resolve this
by first removing the existing project and pulling the desired KwanLab/Autometa
project using nextflow.
If a local project exists (you can check with nextflow list), first drop this project:
nextflow drop KwanLab/Autometa
Now pull the desired revision:
nextflow pull KwanLab/Autometa -r 2.0.0
# or
nextflow pull KwanLab/Autometa -r main
# or
nextflow pull KwanLab/Autometa -r dev
# Now run nf-core with selected revision from above
nf-core launch KwanLab/Autometa -r <2.0.0|main|dev>
Now after re-running nf-core launch ... select the revision that you downloaded from above.
You will then be asked to choose “Web based” or “Command line” for selecting/providing options. While it is possible to use the command line version, it is preferred and easier to use the web-based GUI. Use the arrow keys to select one or the other and then press return/enter.
Setting parameters with a web-based GUI
The GUI will present all available parameters, though some extra parameters may be hidden (these can be revealed by selecting “Show hidden params” on the right side of the page).
Required parameters
The first required parameter is the input sample sheet for the Autometa workflow, specified using --input. This is the path to your input sample sheet.
See Preparing a Sample Sheet for additional details.
The other parameter is a nextflow argument, specified with -profile. This configures nextflow and the Autometa workflow as outlined in the respective
“profiles” section in the pipeline’s nextflow.config file.
standard(default): runs all process jobs locally, (currently this requires Docker, i.e. docker is enabled for all processes the default profile).
slurm: submits all process jobs into the slurm queue. See SLURM before using
docker: enables docker for all processes
Caution
Additional profiles exists in the nextflow.config file, however these have not yet been tested. If you
are able to successfully configure these profiles, please get in touch or submit a pull request and we will add these configurations
to the repository.
mamba: Enables running all processes using mambasingularity: Enables running all processes using singularitypodman: Enables running all processes using podmanshifter: Enables running all processes using shiftercharliecloud: Enables running all processes using charliecloud
Caution
Notice the number of hyphens used between --input and -profile. --input is an Autometa workflow parameter
where as -profile is a nextflow argument. This difference in hyphens is true for passing in all arguments to the Autometa
workflow and nextflow, respectively.
Running the pipeline
After you are finished double-checking your parameter settings, click “Launch”
at the top right of web based GUI page, or “Launch workflow” at the bottom of
the page. After returning to the terminal you should be provided the option
Do you want to run this command now? [y/n] enter y to begin the pipeline.
This process will lead to nf-core tools creating a file named nf-params.json.
This file contains your specified parameters that differed from the pipeline’s defaults.
This file can also be manually modified and/or shared to allow reproducible configuration
of settings (e.g. among members within a lab sharing the same server).
Additionally all Autometa specific pipeline parameters can be used as command line arguments
using the nextflow run ... command by prepending the parameter name with two hyphens
(e.g. --outdir /path/to/output/workflow/results)
Caution
If you are restarting from a previous run, DO NOT FORGET to also add the -resume flag to the nextflow run command.
Notice only 1 hyphen is used with the -resume nextflow parameter!
Note
You can run the KwanLab/Autometa project without using nf-core if you already have a correctly
formatted parameters file. (like the one generated from nf-core launch ..., i.e. nf-params.json)
nextflow run KwanLab/Autometa -params-file nf-params.json -profile slurm -resume
Advanced
Parallel computing and computer resource allotment
While you might want to provide Autometa all the compute resources available in order to get results faster, that may or may not actually achieve the fastest run time.
Within the Autometa pipeline, parallelization happens by providing all the assemblies at once to software that internally handles parallelization.
The Autometa pipeline will try and use all resources available to individual pipeline modules. Each module/process has been pre-assigned resource allotments via a low/medium/high tag. This means that even if you don’t select for the pipeline to run in parallel some modules (e.g. DIAMOND BLAST) may still use multiple cores.
The maximum number of CPUs that any single module can use is defined with the
--max_cpusoption (default: 4).You can also set
--max_memory(default: 16GB)--max_time(default: 240h).--max_timerefers to the maximum time each process is allowed to run, not the execution time for the the entire pipeline.
Databases
Autometa uses the following NCBI databases throughout its pipeline:
- Non-redundant nr database
- prot.accession2taxid.gz
- nodes.dmp, names.dmp and merged.dmp - Found within
If you are running autometa for the first time you’ll have to download these databases.
You may use autometa-update-databases --update-ncbi. This will download the databases to the default path. You can check
the default paths using autometa-config --print. If you need to change the default download directory you can use
autometa-config --section databases --option ncbi --value <path/to/new/ncbi_database_directory>.
See autometa-update-databases -h and autometa-config -h for full list of options.
In your nf-params.json file you also need to specify the directory where the different databases are present.
Make sure that the directory path contains the following databases:
Diamond formatted nr file => nr.dmnd
Extracted files from tarball taxdump.tar.gz
prot.accession2taxid.gz
{
    "single_db_dir" = "$HOME/Autometa/autometa/databases/ncbi"
}
Note
Find the above section of code in nf-params.json and update this path to the folder
with all of the downloaded/formatted NCBI databases.
CPUs, Memory, Disk
Note
Like nf-core pipelines, we have set some automatic defaults for Autometa’s processes. These are dynamic and each process will try a second attempt using more resources if the first fails due to resources. Resources are always capped by the parameters (show with defaults):
--max_cpus = 2--max_memory = 6.GB--max_time = 48.h
The best practice to change the resources is to create a new config file and point to it at runtime by adding the
flag -c path/to/custom/file.config
For example, to give all resource-intensive (i.e. having label process_high) jobs additional memory and cpus, create a file called process_high_mem.config and insert
process {
    withLabel:process_high {
        memory = 200.GB
        cpus = 32
    }
}
Then your command to run the pipeline (assuming you’ve already run nf-core launch KwanLab/Autometa which created
a nf-params.json file) would look something like:
nextflow run KwanLab/Autometa -params-file nf-params.json -c process_high_mem.config
Caution
If you are restarting from a previous run, DO NOT FORGET to also add the -resume flag to the nextflow run command.
Notice only 1 hyphen is used with the -resume nextflow parameter!
For additional information and examples see Tuning workflow resources
Additional Autometa parameters
Up to date descriptions and default values of Autometa’s nextflow parameters can be viewed using the following command:
nextflow run KwanLab/Autometa -r main --help
You can also adjust other pipeline parameters that ultimately control how binning is performed.
params.length_cutoff : Smallest contig you want binned (default is 3000bp)
params.kmer_size : kmer size to use
params.norm_method : Which kmer frequency normalization method to use. See
Advanced Usage section for details
params.pca_dimensions : Number of dimensions of which to reduce the initial k-mer frequencies
matrix (default is 50). See Advanced Usage section for details
params.embedding_method : Choices are sksne, bhsne, umap, densmap, trimap
(default is bhsne) See Advanced Usage section for details
params.embedding_dimensions : Final dimensions of the kmer frequencies matrix (default is 2).
See Advanced Usage section for details
params.kingdom : Bin contigs belonging to this kingdom. Choices are bacteria and archaea
(default is bacteria).
params.clustering_method : Cluster contigs using which clustering method. Choices are “dbscan” and “hdbscan”
(default is “dbscan”). See Advanced Usage section for details
params.binning_starting_rank : Which taxonomic rank to start the binning from. Choices are superkingdom, phylum,
class, order, family, genus, species (default is superkingdom). See Advanced Usage section for details
params.classification_method : Which clustering method to use for unclustered recruitment step.
Choices are decision_tree and random_forest (default is decision_tree). See Advanced Usage section for details
params.completeness : Minimum completeness needed to keep a cluster (default is at least 20% complete, e.g. 20).
See Advanced Usage section for details
params.purity : Minimum purity needed to keep a cluster (default is at least 95% pure, e.g. 95).
See Advanced Usage section for details
params.cov_stddev_limit : Which clusters to keep depending on the coverage std.dev (default is 25%, e.g. 25).
See Advanced Usage section for details
params.gc_stddev_limit : Which clusters to keep depending on the GC% std.dev (default is 5%, e.g. 5).
See Advanced Usage section for details
Customizing Autometa’s Scripts
In case you want to tweak some of the scripts, run on your own scheduling system or modify the pipeline you can clone the repository and then run nextflow directly from the scripts as below:
# Clone the autometa repository into current directory
git clone git@github.com:KwanLab/Autometa.git

# Modify some code
# e.g. one of the local modules
code $HOME/Autometa/modules/local/align_reads.nf

# Generate nf-params.json file using nf-core
nf-core launch $HOME/Autometa

# Then run nextflow
nextflow run $HOME/Autometa -params-file nf-params.json -profile slurm
Note
If you only have a few metagenomes to process and you would like to customize Autometa’s behavior, it may be easier to first try customization of the 🐚 Bash Workflow 🐚
Useful options
-c : In case you have configured nextflow with your executor (see Configuring your process executor)
and have made other modifications on how to run nextflow using your nexflow.config file, you can specify that file
using the -c flag
To see all of the command line options available you can refer to nexflow CLI documentation
Resuming the workflow
One of the most powerful features of nextflow is resuming the workflow from the last completed process. If your pipeline
was interrupted for some reason you can resume it from the last completed process using the resume flag (-resume).
Eg, nextflow run KwanLab/Autometa -params-file nf-params.json -c my_other_parameters.config -resume
Execution Report
After running nextflow you can see the execution statistics of your autometa run, including the time taken, CPUs used,
RAM used, etc separately for each process. Nextflow will generate summary, timeline and trace reports automatically for
you in the ${params.outdir}/trace directory. You can read more about this in the
nextflow docs on execution reports.
Visualizing the Workflow
You can visualize the entire workflow ie. create the directed acyclic graph (DAG) of processes from the written DOT file. First install
Graphviz (mamba install -c anaconda graphviz) then do dot -Tpng < pipeline_info/autometa-dot > autometa-dag.png to get the
in the png format.
Configuring your process executor
For nextflow to run the Autometa pipeline through a job scheduler you will need to update the respective profile
section in nextflow’s config file. Each profile may be configured with any available scheduler as noted in the
nextflow executors docs. By default nextflow will use your
local computer as the ‘executor’. The next section briefly walks through nextflow executor configuration to run
with the slurm job scheduler.
We have prepared a template for nextflow.config which you can access from the KwanLab/Autometa GitHub repository using this
nextflow.config template. Go ahead
and copy this file to your desired location and open it in your favorite text editor (eg. Vim, nano, VSCode, etc).
SLURM
This allows you to run the pipeline using the SLURM resource manager. To do this you’ll first needed to identify the
slurm partition to use. You can find the available slurm partitions by running sinfo. Example: On running sinfo
on our cluster we get the following:

The slurm partition available on our cluster is queue. You’ll need to update this in nextflow.config.
profiles {
    // Find this section of code in nextflow.config
    slurm {
        process.executor       = "slurm"
        // NOTE: You can determine your slurm partition (e.g. process.queue) with the `sinfo` command
        // Set SLURM partition with queue directive.
        process.queue = "queue" // <<-- change this to whatever your partition is called
        // queue is the slurm partition to use in our case
        docker.enabled         = true
        docker.userEmulation   = true
        singularity.enabled    = false
        podman.enabled         = false
        shifter.enabled        = false
        charliecloud.enabled   = false
        executor {
            queueSize = 8
        }
    }
}
More parameters that are available for the slurm executor are listed in the nextflow executor docs for slurm.
Docker image selection
Especially when developing new features it may be necessary to run the pipeline with a custom docker image.
Create a new image by navigating to the top Autometa directory and running make image. This will create a new
Autometa Docker image, tagged with the name of the current Git branch.
To use this tagged version (or any other Autometa image tag) add the argument --autometa_image tag_name to the nextflow run command